Standard HA Infra Configuration and Provision Guide on AWS Private Cloud
Detailed guide for provisioning iMBrace Platform in High Availability (HA) mode within AWS Private Cloud environments
Standard HA Infra Configuration and Provision Guide on AWS Private Cloud
By: iMBrace Limited
Version: 1.1 (2025-10-16)
Author: Kong Lee
Status: Add MeiliSearch Provisioning
🎯 Objective
This document outlines the standard configurations and provisioning steps required to deploy the iMBrace Platform in HA (High Availability) mode within an AWS Private Cloud environment.
For demonstration, the example customer is Solara Limited (solara.io / solara.lan).
Please replace “Solara” with the actual customer name in your deployment.
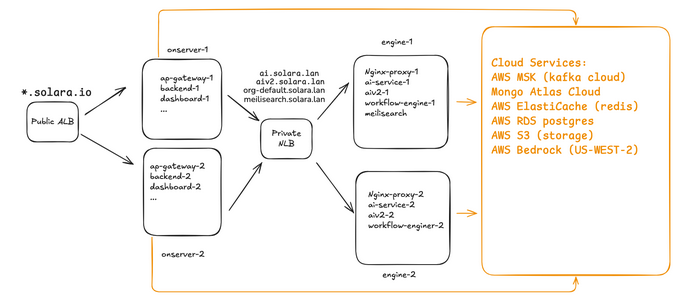
🏗️ Infra Architecture Overview
AWS Route 53
Create public zone for customer
- Create A-record aliases pointing to the ALB DNS Name after ALB creation.
- A public domain name should be created for the customer and hosted in the public zone on their AWS account.
- The format should be:
{customer_short_name}.{Optional:subdomain}.{TLD} - E.g. solara.io, solara.uat.io, xyz.tech xyz.poc.tech
- In this document, we use solara.io to illustrate the know-hows
- Create A-record alias for ALB after creating the ALB.
Create private zone for customerPrivate Zone
- A private domain should be created for the customer and hosted in the private zone on their AWS account.
- The format should be:
{customer_short_name}.{Optional:subdomain}.lan - In this document, we use solara.lan to illustrate the know-hows
- Associate to corresponding VPC.
- Create A-record alias for NLB after creating the NLB.
AWS ACM (SSL Certificate)
- Create a request to have AWS issued wildcard SSL certificate:
*.solara.io - Select the Validation method to be: DNS validation
- Select the Key algorithm to be: RSA 2048
- Tags:
- Key: Name
- Value: wildcard.solara.io
🔐 AWS Security Groups (SG)
Create SG for ALB and name it as sg-alb-hk
Inbound Rules
| Protocol | Port | Source | Description |
|---|---|---|---|
| TCP | 4000 | 0.0.0.0/0 | backend-web |
| TCP | 443 | 0.0.0.0/0 | HTTPS |
| TCP | 8000 | 0.0.0.0/0 | backend-admin |
| TCP | 11111 | 0.0.0.0/0 | backend-publicService |
| TCP | 8888 | 0.0.0.0/0 | backend-socket |
| TCP | 80 | 0.0.0.0/0 | HTTP |
| TCP | 5000 | 0.0.0.0/0 | backend-clientWebhook |
| TCP | 9000 | 0.0.0.0/0 | backend-dashboard |
| TCP | 9981 | 0.0.0.0/0 | backend-privateService |
Outbound Rules
- Allow all outbound traffic (0.0.0.0/0)
| IP version | Type | Protocol | Port range | Destination |
|---|---|---|---|---|
| IPv4 | All traffic | All | All | 0.0.0.0/0 |
Create a SG for NLB and name it as NLB — sg-nlb-hk
Inbound Rules
| IP version | Type | Protocol | Port range | Source | Description |
|---|---|---|---|---|---|
| IPv4 | HTTP | TCP | 80 | 0.0.0.0/0 | to-engine-server |
Outbound: Allow all
| IP version | Type | Protocol | Port range | Destination |
|---|---|---|---|---|
| IPv4 | All traffic | All | All | 0.0.0.0/0 |
Create a SG for onserver servers and name it as sg-onserver
Inbound Rules
| IP version | Type | Protocol | Port | Source | Description |
|---|---|---|---|---|---|
| IPv4 | Custom TCP | TCP | 9001 | 0.0.0.0/0 | app-gateway |
| IPv4 | Custom TCP | TCP | 4000 | 0.0.0.0/0 | backend-web |
| IPv4 | Custom TCP | TCP | 8000 | 0.0.0.0/0 | backend-admin |
| IPv4 | Custom TCP | TCP | 11111 | 0.0.0.0/0 | backend-publicService |
| IPv4 | Custom TCP | TCP | 8888 | 0.0.0.0/0 | backend-socket |
| IPv4 | Custom TCP | TCP | 5000 | 0.0.0.0/0 | backend-clientWebhook |
| IPv4 | Custom TCP | TCP | 9000 | 0.0.0.0/0 | backend-dashboard |
| IPv4 | Custom TCP | TCP | 9981 | 0.0.0.0/0 | backend-privateService |
| IPv4 | Custom TCP | TCP | 3050 | 0.0.0.0/0 | chat-widget |
| IPv4 | Custom TCP | TCP | 80 | 0.0.0.0/0 | dashboard |
| IPv4 | Custom TCP | TCP | 9982 | 0.0.0.0/0 | marketplace |
| IPv4 | Custom TCP | TCP | 3000 | 0.0.0.0/0 | wcs |
Outbound: Allow all
| IP version | Type | Protocol | Port range | Destination |
|---|---|---|---|---|
| IPv4 | All traffic | All | All | 0.0.0.0/0 |
Create a SG for engine servers and name it as sg-engine
Inbound Rules
| IP version | Type | Protocol | Port | Source | Description |
|---|---|---|---|---|---|
| IPv4 | HTTP | TCP | 80 | 0.0.0.0/0 | nginx-proxy |
Outbound: Allow all
| IP version | Type | Protocol | Port range | Destination |
|---|---|---|---|---|
| IPv4 | All traffic | All | All | 0.0.0.0/0 |
Create a SG for ssh to servers and name it as sg-ssh-all
Inbound Rules
| IP version | Type | Protocol | Port | Source | Description |
|---|---|---|---|---|---|
| IPv4 | SSH | TCP | 22 | 0.0.0.0/0 | ssh-all |
Outbound: Allow all
| IP version | Type | Protocol | Port range | Destination |
|---|---|---|---|---|
| IPv4 | All traffic | All | All | 0.0.0.0/0 |
Create a SG for RDS postgres and name it as sg-workflow-db
Inbound Rules
| IP version | Type | Protocol | Port | Source | Description |
|---|---|---|---|---|---|
| IPv4 | PostgreSQL | TCP | 5432 | Private IP (engine-1) | engine-1-server |
| IPv4 | PostgreSQL | TCP | 5432 | Private IP (engine-2) | engine-2-server |
Outbound: Allow all
| IP version | Type | Protocol | Port range | Destination |
|---|---|---|---|---|
| IPv4 | All traffic | All | All | 0.0.0.0/0 |
Create SGs for ElastiCache Redis sg-workflow-redis and sg-backend-redis
Inbound Rules
| IP version | Type | Protocol | Port | Source | Description |
|---|---|---|---|---|---|
| IPv4 | Custom TCP | TCP | 6379 | Private_ip range for provisioned VPC CIDR (e.g. 10.170.0.0/24) | E.g. 10.170.0.0/24 that is the provisioned vpc CIDR range. |
| IPv4 | Custom TCP | TCP | 6379 | Private_ip range for provisioned VPC CIDR (e.g. 10.170.0.0/24) | E.g. 10.170.0.0/24 that is the provisioned vpc CIDR range. |
Outbound: Allow all
| IP version | Type | Protocol | Port range | Destination |
|---|---|---|---|---|
| IPv4 | All traffic | All | All | 0.0.0.0/0 |
MSK Cluster — sg-msk-cluster
Inbound Rules
| IP version | Type | Protocol | Port | Source | Description |
|---|---|---|---|---|---|
| IPv4 | Custom TCP | TCP | 9098 | Private_ip range for provisioned VPC CIDR | Kafka brokers access E.g. 10.170.0.0/24 that is the provisioned vpc CIDR range. |
Outbound: Allow all
| IP version | Type | Protocol | Port range | Destination |
|---|---|---|---|---|
| IPv4 | All traffic | All | All | 0.0.0.0/0 |
⚙️ AWS EC2 Configuration
| Hostname | Purpose | Example |
|---|---|---|
onserver-1 | Public-facing applications | ec2-chatbot-uat-hk-AppServer-1 |
onserver-2 | Public-facing applications | ec2-chatbot-uat-hk-AppServer-2 |
engine-1 | Workflow & AI services | ec2-chatbot-uat-hk-Backend-1 |
engine-2 | Workflow & AI services | ec2-chatbot-uat-hk-Backend-2 |
Security Groups assigned:
sg-onserver→ onserver-1, onserver-2sg-engine→ engine-1, engine-2sg-ssh-all→ all servers
Attach the IAM role Ec2MskRole to servers:
- onserver-1, onserver-2, engine-1, engine-2
- Note: you should do it later after creating the IAM role and MSK clusters.
🌐 AWS Application Load Balancer (ALB)
Create Public ALB
- Naming convention:
alb-{region}. E.g. alb-hk - Internet-facing
- IPv4
- Associates all subnets to alb-hk
Create Target Groups (TGs)
- We create TGs in advance and then associate them to corresponding listeners later.
- Naming convention:
{application or stack or usage}-{Optional: env}-tg - Some examples:
- E.g 1. app-gateway-socketio-tg or app-gateway-uat-socketio-tg
- E.g 2 backend-dashboard-tg or backend-dashboard-uat-tg
- Use spreadsheet reference:
ALB and NLB Config Spreadsheet
Create Listeners and rules:
-
Configure HTTP (80) and HTTPS (443) listeners per spreadsheet tabs:
- Public ALB Target Groups ⦁ Create Backend and Others Listeners and rules based on the spreadsheet
- Public ALB Listeners (Port 443) Create HTTPS:443 Listeners and rules based on the spreadsheet
-
Note: HTTPS:443 Listeners and rules we list it at particular tab
Create DNS Aliases (Route53 public zone)
DNS Aliases (Route53 public zone):
- Create A-record alias for:
- app-gateway.solara.io → Alias → ALB DNS Name (e.g. dualstack.alb-hk-xxxx.ap-east-1.elb.amazonaws.com)
- api.solara.io → Alias → ALB DNS Name
- app-api.solara.io → Alias → ALB DNS Name
- chat-widget.solara.io → Alias → ALB DNS Name
- marketplace.solara.io → Alias → ALB DNS Name
- webapp.solara.io → Alias → ALB DNS Name
- wcs.solara.io → Alias → ALB DNS Name
🔁 AWS Network Load Balancer (NLB)
Objective
The purpose of this section is to provision an AWS internal Network Load Balancer (NLB) that will:
- Be accessible via DNS records
ai.solara.lan,aiv2.solara.lanandorg-default.solara.lan - Operate within internal subnets
subnet-engine-1andsubnet-engine-2. - Distribute traffic (port 80/TCP) across two backend EC2 servers:
engine-1andengine-2.
Create NLB
- Naming convention:
nlb-{region}. E.g. nlb-hk - Internal
- IPv4
- Associates all subnets to nlb-hk
Prerequisites
- VPC with subnets:
- subnet-engine-1
- subnet-engine-2
- EC2 instances:
- engine-1 (running service on port 80)
- engine-2 (running service on port 80)
- Security Group:
- sg-nlb (It has been mentioned above.)
Route53 private hosted zone for solara.lan.
Implementation Steps
Create Target Group (TGs)
- Name:
engine-tg - Type: Instance (targets are EC2 instances)
- Protocol: TCP
- Port: 80
- Health Checks:
- Protocol: HTTP
- Path: /
- Healthy threshold: 5
- Unhealthy threshold: 2
- Timeout: 10s
- Interval: 30s
- Success codes: 200-399
- Add engine-1 and engine-2 as registered targets.
Create Internal NLB
- Name: nlb-hk
- Scheme: Internal
- Subnets: subnet-engine-1, subnet-engine-2
- Security groups: sg-nlb
- Listeners:
- Protocol: TCP
- Port: 80
- Forward to: engine-tg
- Tag:
- Key: Name
- Value: engine
Configure DNS Aliases (Route53 private zone solara.lan):
- Create A-record alias for:
ai.solara.lan→ Alias → NLB DNS Nameaiv2.solara.lan→ Alias → NLB DNS Nameorg-default.solara.lan→ Alias → NLB DNS Namemeilisearch.solara.lan→ Alias → NLB DNS Name
🔐 AWS IAM Configuration
1. MSK Access Policy (MSKFullAccessPolicy)
⦁ Create custom permission for MSK and name it as MSKFullAccessPolicy.
{
"Version": "2012-10-17",
"Statement": [
    {
    "Sid": "MSKFullAccess",
    "Effect": "Allow",
    "Action": ["kafka:*", "kafka-cluster:*"],
    "Resource": "*"
    }
]
}
2. Create EC2 Instance Role (Ec2MskRole)
Trust Relationship:
{
"Version": "2012-10-17",
"Statement": [
    {
    "Effect": "Allow",
    "Principal": { "Service": "ec2.amazonaws.com" },
    "Action": "sts:AssumeRole"
    }
]
}
Permissions: Attach the above MSKFullAccessPolicy to the role.
3. Bedrock and S3 Access
Bedrock Power User Policy:
{
"Version": "2012-10-17",
"Statement": [
    {
    "Sid": "BedrockFullAccess",
    "Effect": "Allow",
    "Action": ["bedrock:*"],
    "Resource": "*"
    }
]
}
S3 Data Bucket Policy (imbrace-data-solara)
-
Create custom permission for Bedrock and name it as
bedrock-power-user.{ "Version": "2012-10-17", "Statement": [ { "Sid": "BedrockFullAccess", "Effect": "Allow", "Action": [ "bedrock:*" ], "Resource": "*" } ] } -
Create custom permissions for accessing S3 bucket
imbrace-data-solaraand name it ass3-full-imbrace-data-solara.{ "Version": "2012-10-17", "Statement": [ { "Sid": "VisualEditor0", "Effect": "Allow", "Action": [ "s3:ListStorageLensConfigurations", "s3:ListAccessPointsForObjectLambda", "s3:GetAccessPoint", "s3:PutAccountPublicAccessBlock", "s3:GetAccountPublicAccessBlock", "s3:ListAllMyBuckets", "s3:ListAccessPoints", "s3:PutAccessPointPublicAccessBlock", "s3:ListJobs", "s3:PutStorageLensConfiguration", "s3:ListMultiRegionAccessPoints", "s3:CreateJob" ], "Resource": "*" }, { "Sid": "VisualEditor1", "Effect": "Allow", "Action": "s3:*", "Resource": [ "arn:aws:s3:::imbrace-data-solara", "arn:aws:s3:::imbrace-data-solara/*" ] } ] } -
Create an IAM user named as
imbrace-app-userwith programmatic access key only. -
Save the programmatic credentials in the safe place.
-
You need to specify the above credentials contexts to some imbrace application configuration file.
-
Grant it the permissions
bedrock-power-userands3-full-imbrace-data-solara
AWS S3
iMBrace data bucket
-
Create bucket
imbrace-data-{customer}. It isimbrace-data-solarafor example. -
Allow encryption at rest.
-
Allow all public access
-
Configure the bucket policy:
{
    "Version": "2012-10-17",
    "Statement": [
        {
            "Sid": "PublicReadGetObjectEmbedding",
            "Effect": "Allow",
            "Principal": "*",
            "Action": "s3:GetObject",
            "Resource": "arn:aws:s3:::imbrace-data-solara/embedding/*"
        },
        {
            "Sid": "PublicReadGetObjectBoard",
            "Effect": "Allow",
            "Principal": "*",
            "Action": "s3:GetObject",
            "Resource": "arn:aws:s3:::imbrace-data-solara/board/*"
        }
    ]
}
CORS Configuration
[
    {
        "AllowedHeaders": ["*"],
        "AllowedMethods": ["PUT", "POST", "GET", "HEAD"],
        "AllowedOrigins": ["*"],
        "ExposeHeaders": []
    }
]
MSK logs bucket
- Create bucket
msk-logs-{customer}. It ismsk-logs-solarafor example. - Allow encryption at rest.
- Disable all public accesses.
AWS RDS PostgreSQL
- Create RDS Postgres DB
- Credentials:
- Username: postgres
- Password: iMBraceAwsHa1234 (initial password)
- Associates to SG
sg-workflow-db
- Credentials:
AWS ElastiCache
-
Create Redis for workflow without authentication:
- Type:
cache.t3.medium - Create a new subgroup and associate it to the corresponding two db subnets. E.g. subnet-chatbot-uat-db-1 and subnet-chatbot-uat-db-2
- Associates to SG
sg-workflow-redis
- Type:
-
Create Redis for backend with authentication:
- Type:
cache.t3.small - Create a new subgroup and associate it to the corresponding two db subnets. E.g. subnet-chatbot-uat-db-1 and subnet-chatbot-uat-db-2
- Associates to SG
sg-backend-redis - Username: imbrace
- Password: iMBraceAwsHa1234 (initial password)
- Type:
AWS MSK (Kafka)
Establish two clusters, each containing two brokers.
Each cluster configurations
-
Create a new cluster by selecting “Custom create” method
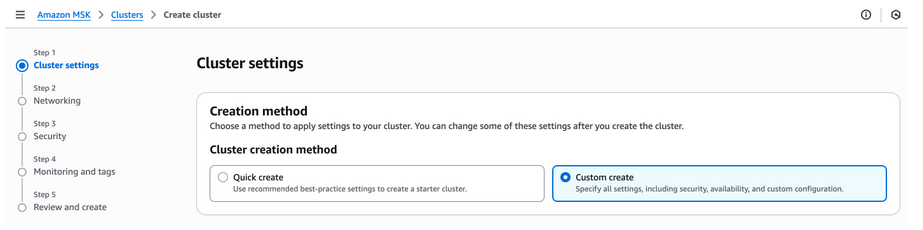
-
Cluster name:
prod-custer-1 -
Apache Kafka version:
4.0.x -
Metadata mode:
KRaft -
Broker type:
standard brokers -
Broker size:
kafka.m7g.large -
Number of zones:
2 -
Brokers per zone:
1 -
Storage:
200 GB -
Cluster storage mode:
Tiered storage and EBS storage -
Cluster configuration:
Default Amazon MSK configuration -
Networking:
- VPC:
provisioned vpc - Zone selection:
ap-east-1aandap-east-1b - Subnet selection:
ap-east-1atosubbet-db-1;ap-east-1btosubbet-db-2 - Public access:
off - Security Group:
msk-cluster
- VPC:
-
Security
- Access control methods: select only “IAM role-based authentication”
- Note: We use the EC2 instance profile IAM
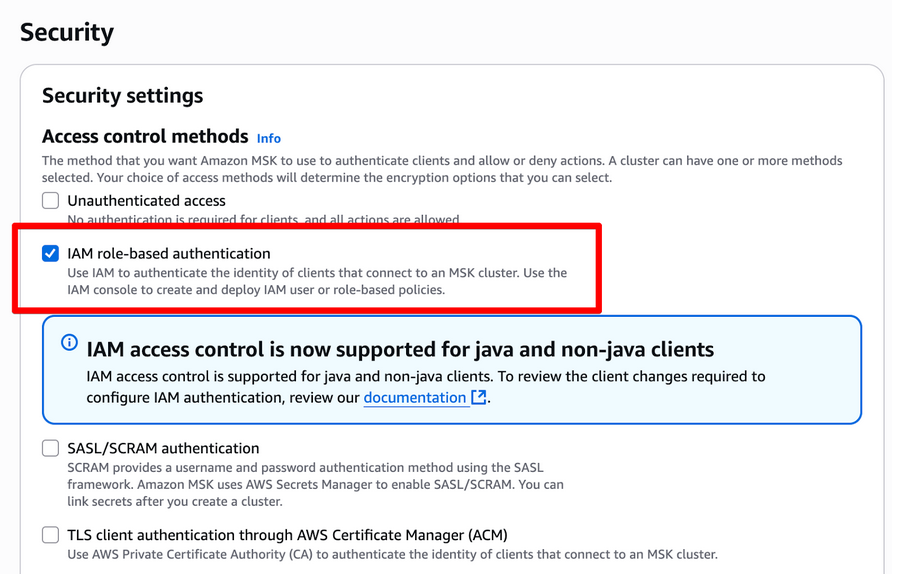
-
Encryption
- Encrypt data in transit: leave default setting.
- Encrypt data at rest: Use AWS managed key

-
Monitoring: Basic monitoring
-
Broker log delivery:
- select “Deliver to Amazon S3”
- select bucket “solara-msk-logs”

-
Repeat all above steps for the other cluster.
-
Attach the IAM role Ec2MskRole to servers:
-
onserver-1,onserver-2,engine-1,engine-2
AWS Bedrock
- Enable AWS Bedrock service at Region: us-west-2 (Oregon)
- Models:
- Titan Text Embeddings V2
- Llama 4 Maverick 17B Instruct
MeiliSearch Installation (on engine-1)
Installation
-
SSH to engine1 server
-
Download installation script at the home directory
-
Make script executable & run
wget https://imbrace-shared.s3.ap-east-1.amazonaws.com/infra/public-share/install-meilisearch.sh chmod +x install-meilisearch.sh sudo ./install-meilisearch.sh -
Record the master key The script prints out the MASTER_KEY (hex string). Save it in a safe place because you’ll need it to interact with Meilisearch’s secured endpoints.
-
Check the logs / service
sudo journalctl -u meilisearch -f -
Verify the endpoint
    curl -X GET "http://localhost:7700/health"
    # Expect: { "status": "available" }
curl http://<private_ip_engine1>:7700/health # Expect: { "status": "available" } -
Restart / stop / status of the meilisearch service (optional)
    sudo systemctl restart meilisearch
    sudo systemctl stop meilisearch
    sudo systemctl status meilisearch
Application Information
version = meilisearch 1.23.0 or higher
binary_path = /usr/local/bin/meilisearch
config_path = /etc/meilisearch.toml
data_dir = /var/lib/meilisearch/
db_path = /var/lib/meilisearch/data
dump_dir = /var/lib/meilisearch/dumps
snapshot_dir = /var/lib/meilisearch/snapshots
Uninstallation
- Download uninstallation script
    wget https://imbrace-shared.s3.ap-east-1.amazonaws.com/infra/public-share/uninstall-meilisearch.sh
    chmod +x uninstall-meilisearch.sh
    sudo ./uninstall-meilisearch.sh
What the uninstallation does:
- Stops and disables the meilisearch systemd service
- Removes the systemd service file
- Reloads the systemd daemon
- Removes the configuration file (/etc/meilisearch.toml)
- Removes the binary (/usr/local/bin/meilisearch)
- Prompts before removing the data directory (since this contains all your Meilisearch data)
- Removes the meilisearch system user
iMBrace Platform Environment Specification
Technical specification of iMBrace platform environments including AWS Private Cloud and On-Premise deployments
Standard Private Cloud HA Deployment Guide
Step-by-step guide for provisioning and deploying the iMBrace Platform in High Availability (HA) mode on AWS Private Cloud